12/2/02 UPDATE: My boyfriend Todd and I took a trip out to visit Maxi this past weekend. He managed to get the overtightened lugnuts off of two wheels, and kept the car off the ground by using an AMC steel wheel and an AMX slotted rim. The tire on the steel wheel made funny sounds as all the air we pumped into it promptly escaped! Before we left, Todd punched (yes, punched) out one of the dents in the rear quarter from inside the trunk. But while I commented on how worried I was about what repairs would be needed to get a MASS inspection, I made a huge chunk of rust fall to the ground. It didn't help me to stop worrying. BUT, Todd said "don't worry". I'm worrying...
Back home, Todd showed me how to take the trim rings off without denting them. Then he took off the center cap from the wheel that had one. The AMC logo was missing, and he managed to find 2 used original ones. He also tried to buff up the cap a bit. But I located an NOS set with correct metal inserts, and if all goes well, I will have them soon. I should also have replacement tail lights, too. Only thing is, while looking through the parts in Todd's basement, he found a stack of lenses! Six total!! All better than what is on the car and while not perfect, I'd have been happy with them all fixed up! But he let me have them to practice repainting the silver trim with.
But let's get back to wheels. We transported the wheels to my house, a whopping one block away, and I then washed them up the best I could in freezing weather and at night. I got most of the spider nests off and let them dry in the basement overnight. The next step was clean with a wire brush, prime the rear then put a cheap coat of gloss black paint on for a little protection. Then I used some metal sandpaper on the few small rust spots on the front sides. Once everything was prepped, on went the primer. Then satin black. Tonight after work, I masked off the black areas (by the lugnuts) with painter's masking tape, then applied the charcoal color. The paint dries rather fast, so I was able to remove the masking after a short wait. The result looks very nice, though there are a few spots where the knife I used to cut the tape slipped, and you can see the primer below. When I do the other two wheels, I will have to be more careful. I hope, though, that the paint hardens a lot more. I mean, if it stays that soft, I am in trouble.
The primer I used was a special Rustoleum, as was the gloss black. The satin black and charcoal are from Eastwood Tools. I had bought their Magnum 500 masking kit, but it is for 15" wheels, so it didn't work out. But the paint seems very nice. Todd says the charcoal color on the original wheels was very rough. The texture may not match, but I like the new look far better than the blue!! I carefully laid a trim ring and cap on one wheel so I could take a photo for the page. Can't wait to see how they look on the car! I will have to buy tires in the future, though, as I noticed that the Coopers don't match.
12/14/02 UPDATE:Well, it seems that my choice of paint may not be totally correct. The photos I was going by showed the center of the spokes to be a charcoal color. That's what I used. Now I find out maybe they should have been silver. After all that work, they are staying as-is!! I still have to paint the other two! The four NOS center caps should be here in a few days. Can't wait! :-) Mustn't forget to get some new lugnuts...
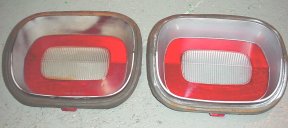
Todd donated some used tail light lenses for me to practice painting. They got a spiffing last week. I masked off the inner plastic, then sprayed the outer rim with Duplicolor GM silver. I have used it on models before, but when I added one clear topcoat for protection, it came out shinier than expected. Not totally correct, but they will probably last longer than the original paint did.
Next, I used some car polish on the plastic lenses. The rubber gaskets still look tatty, but the units look a LOT better than before!!! The photo to the left shows one untouched unit, and one all nice and revived.
UPDATE PAGE #1
Pre-engine work progress reports , NEWEST LAST
12/29/02 UPDATE: The two painted wheels are back on the car, and now I have to spray the other two. I can't finish washing off all the spider nests untill the weather warms up and thaws out the hose in the back yard. I can't wait to get them done and out of my way. This time, I will try using a "spray can trigger" in an effort to save my fingers... The new center caps look GREAT! I'm not sure about the hardware, but the caps are indeed NOS. They look real sharp! New lugnuts, too! :-)
I located an engine a few weeks back, and it is on its way from CA. It will supposedly be delivered to it's destination tomorrow. We shall see... Have also located a transmission. I bought an engine stand and Todd got me some tools for Christmas, so I guess there's no turning back now!!
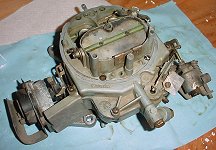
1/5/03 UPDATE:My engine finally arrived last week, and Todd went to pick it up for me. It's out in storage along with the car, and I have yet to see it. Bad news is it has a dented valve cover, broken exhaust manifold, and the carb is gone, contrary to what I was told when I bought it. I found a Motorcraft carb online last night for a lot less than a new Edelbrock, and it's from a '74 Jeep , so I should be all set. But I'm still miffed that the engine didn't have one... Anyhoo, the good news is that it does indeed appear to have been compression-tested, as the wires are all disconnected from the plugs. I was told that compression was 150 all around, and that that's good. I hope so... Todd says that it looks like a good motor for a good price. I hope so, because I'm still having trouble forgiving myself for spending that much money on anything other than a down-payment on new Crown Vic...
BUT I DIGRESS...Today I got hold of a radiator, so that's one more big item off my TO GET list. Todd says it looks like a Modine unit. I don't mind as long as it doesn't look totally incorrect. The man was usefull as he also provided engine mounts, window cranks, and those little parts that attatch the rocker panels to the car. We still have to pick up the transmission and fender being held for me The Mystery Connection, a VERY usefull man here in MA who should just open an AMC parts counter of his very own! If he reads this, he knows I'm talking about him ;-)
Started painting the other two wheels the other day. The first two were fun, now it's a chore. Can't wait to get them on the car and out of the cellar.................
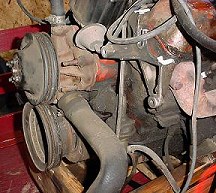
1/31/03 UPDATE: My engine is finally in the garage! After a trip to a hardware store for some grade 8 bolts, chain, and hardware, we started to work at getting the 401 off Todd's trailer and onto my engine stand with his hoist. It wasn't easy, but finally the hunk of metal met its new home.
The passenger side exhaust manifold still has that funky metal whatzit that connects to the air cleaner. I'm told his rarely survives. The "Z" code tag is still on the vavlve cover, which supposedly is in amazing shape, with no rust or pitting. The Jeep it came from must have been on the road recently, due to the recent style oil filter and plug for the block heater
The driver side manifold is broken, so I need to replace that. The valve cover is dented, and Todd is trying to prep a nasty spare he has for me to replace it with. The stickers on it now say that the Jeep engine was built in November of 1973, so it was for a 74, which is perfect! Hopefully some new gaskets along with the valve cover will fix some of that oil leaking...
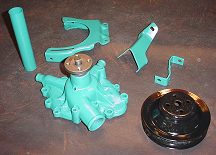
The power steering pump bracket is broken, but supposedly the original pump and bracket are still in the car. I hope so... Once it warms up outside, Todd wants to flip the engine over, take the oil pan off, and check the bearings... or something like that. Sometimes what he tells me goes over my head a bit, but most I do catch... :-)
Some of the parts I want to try and replace while the engine is out of the car are some gaskets, water pump, fuel pump, and ignition coil. Todd says we will do the rotor and points, too, though I think I'll let him play with those... I can't even begin to think about how in the world we will get all the right size nuts, bolts, clamps, hoses, and wires needed to get this thing running... it's too overwhelming...
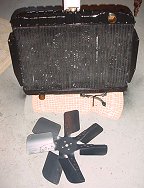
So far I have bought online a correct 7 blade cooling fan, correct air cleaner assembly (still in the mailsteam), and a technical service manual that I can't wait to look through. Also, I got hold of a '74 Motorcraft 4 barrel carburetor off of a 401. The tag on it says "4FA4AAAAF23". I am toying with the idea of having it rebuilt, but on my budget, I wonder if it's worth it.
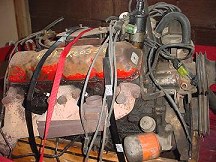
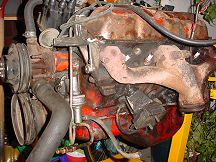
Last weekend I started to try and clean the engine. I bought a large and small brass wire brush and put newspaper underneath the oily item. I wasn't sure what to use to cut through the gunk, so I tried straight Simple Green. It worked to a point, but the brush got all gummed up with oil and grease, and the stuff didn't exactly fall off in hunks or anything... It was below freezing in the garage, dark, and I was getting messy. I started to realize I am going to have to take some parts off to make the job fractionally easier. The slow progress made me call it quits after about an hour. Todd has some heavy duty cleaner for me to try next. All I know is, that thing will never get painted if I can't get it clean... therefore it may never be painted!!!!!
What an hour of cleaning accomplished first time around
Which brings up another topic: engine color. I bought a can of paint from Eastwood that was supposed to be for '68-'74. I didn't realize there was more than one shade of blue for these engines. Todd states with vigor that the correct color for a '74 engine is a non-metallic dark-aqua blue. I didn't believe him, as I have yet to see an engine in any blue that wasn't metallic. Then, he found an old valve cover for me, and it had some original paint on it. Non-metallic. I still didn't believe him, until I saw a few more old parts laying around with that shade of blue. He assures me that is the correct color, so as much as I dislike it (for now, anyway), I want it all to be correct, so non-metallic it shall be unless someone proves to me a '74 should be metallic.
A few people have said that my engine is red because it is a California Emissions one. Some people thought maybe it was an International Harvester engine, but it clearly states on the valve cover it is from a Jeep. The motor was indeed shipped from CA, and the fact there is less corrosion than usual on it, Todd and Co. feel it is from a very dry area, like a desert or something. I just hope it runs well..............
2/18/03 UPDATE: After price-shopping online, I finally ordered a few parts for the engine. I got a rebuilt water pump and a new Carter fuel pump, along with some gaskets. The last major items I need to get are an alternator, starter, driver side exhaust manifold, and ignition coil. It's been so bitterly cold here in MA lately it's been almost impossible to get the engine cleaned. This past weekend I tried carb cleaner, and it worked ok, but wasn't the magic spray I was told it would be. My boyfriend says once the weather warms up a bit, cleaners will work much better. I hope so, as it sure isn't much fun right now.
I took the radiator inside so it would warmup for painting. While giving it a light wash in the basement sink, I found a little nest inside the upper tank!! After some rather nasty work, I got it out and flushed it our the best I could. I'm thinking of having it looked at by a local radiator company. May be a good idea...
Also, it has been established that the correct color for my engine is "AMC Blue". It's sort of a non-metallic aqua color. Not the prettiest in the world, but not the ugliest, either. Todd gave me one can to start with, and I think the first part I'll paint is the water pump.
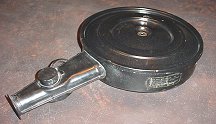
3/2/03 UPDATE: Managed to get outside and do some more engine spiffing yesterday. I bought a smaller putty knife and it worked well for scraping off gunk. I also tried yet another degreaser, this time a ZEP product. I removed the alternator bracket, which was interesting. One bolt just didn't want to loosen up, but after I wiggled the bracket a bit and sprayed on a little liquid wrench, it came loose. Took off the ignition coil and bracket, and oil filler tube as well. I hope to clean them up a bit and paint them, so I can feel like I'm getting stuff done. I painted the replacement water pump and it looks nifty! I used tinfoil to "mask" off the bearings.
One side-note: My boyfriend's kidney transplant has been pushed up a month to March 4th. Hopefully once it's done, he'll start feeling normal again, and after a couple of months, he'll be able to teach me how to check the bottom end of the engine, and eventually, get Maxi running!! He has a rebuilt 360 of his own to get into his blue AMX, too! Then get his present 360 into his Jeep. Then.... A busy summer lays ahead!!
3/8/03 UPDATE:Making progress at a snail's pace amid wintery weather. Today was like summer with temps in the low 40s, so I washed the car (my Ford, that is) and did a little painting outside. First, I sprayed the radiator with paint from Eastwood. Sure dried fast! Then, after cleaning the alternator bracket parts the best I could, I sprayed them with AMC Blue paint (it looks different than in the photo). Lastly, I sprayed the oil filler tube. One interesting observation: while cleaning the alternator bracket, I found more blue paint UNDER the red! So it was either replaced at one point, or AMC started with blue on some parts for CA engines. Hmmm...
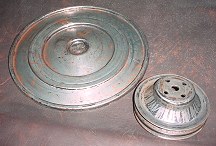
I cleaned up the used fan I picked up, and sprayed it with the same black paint I used on the wheels. Came out well, but I ran out of paint!! I HATE that! I also picked up an air cleaner that is in pretty nice condition, but it may get new paint as well. I ordered a nice 401 decal for it from South Texas AMC. It already has a decal on it saying it's "heavy duty" and what air filter to use. I'm not sure if that decal was used on '74 Javelins but if I paint the air cleaner, I'll mask it off and keep it there. The unit looks a lot like the one I had on my '86 Pontiac!! I picked up a gasket for the bottom, where it meets the carburetor. Now that I have a few parts bought and painted, and it makes me feel like something's actually getting done! I'm not looking for perfection, as I know I'll never get things prepped as well as with a rebuilt engine, but so far I'm happy with how things look. There are a few more gaskets I need to pick up, and I think I have a lead on some exhaust manifolds.
Lastly, my man made it through his operation just fine, and is on the road to recovery. It will be a while before he's as close to normal as he can get, but at least he's feeling a lot better already.
3/28/03 UPDATE:Latest in my slow acquisition of parts is a Pertronix Flamethrower coil and electronic ignition kit. I also have a new type of black paint from Eastwood. They call it "underhood black". The best news is that I successfully applied for a title for Maxi. But I won't be totally happy until it's mailed to me and is in my hands.
4/5/03 UPDATE:I finally had the motivation the other night to paint some parts in the cellar with my new paint, Eastwood's Underhood Black. I started with the radiator fan, and it came out well. Soooo, I moved onto the waterpump pulley, which I had sort of messed up a while back by painting when not totally clean with Rustoleum. As soon as the new paint hit the old, PEEL CITY. I was mad, but figured I could strip it off somehow. Sooo, I moved onto the top of the air cleaner. I sanded a few rusty spots, wiped it all down, then sprayed. PEEL CITY. I was ripping mad this time. Someone at some point must have resprayed it.
So there I was. Mad, tired from work, knowing I wouldn't sleep unless I did something about the paint goof. I called up my boyfriend, vented, then put sweats on over my pajamas, went into the cold garage, and started spraying the parts with this stuff I had read about for stripping pre-painted model cars. I think it's called Aircraft Coating Remover, or something like that. I was out there until 10PM, but the stuff stripped ALL the paint off the air cleaner top!!! It took 5 or 6 applications, and some scraping, but it worked!!
I just did a bit more prep, and sprayed some primer on the parts. Hopefully, the black paint will sit well and the problem will be solved. Though now I have to deal with the BOTTOM half of the air cleaner!!
One easy cleanup was the coil bracket. I took the old, oily coil and put it aside. Then I drew a diagram of how the unit fit together so I wouldn't mess anything up. I took it all apart, cleaned it with steel wool and some carb cleaner, and now it's almost totally clean. I've seen these painted and metal, but this one had no paint on it, so it's going to stay that way.
4/20/03 UPDATE:Woohooooo! I am now the official owner of Maxi, according to the Mass RMV. After months of worrying, I now have a title to the car. I am very happy about that... Todd says we should be able to start doing some engine work in the next few weeks, as soon as the weather warms up. I hope so, because people are starting to drive their cool cars around, and I'd like to join them!